
Rebuilding the Wrecked Bugatti Chiron Pur Sport: From Broken Mount to First Start-Up
Reconnecting a Crashed Chiron Pur Sport
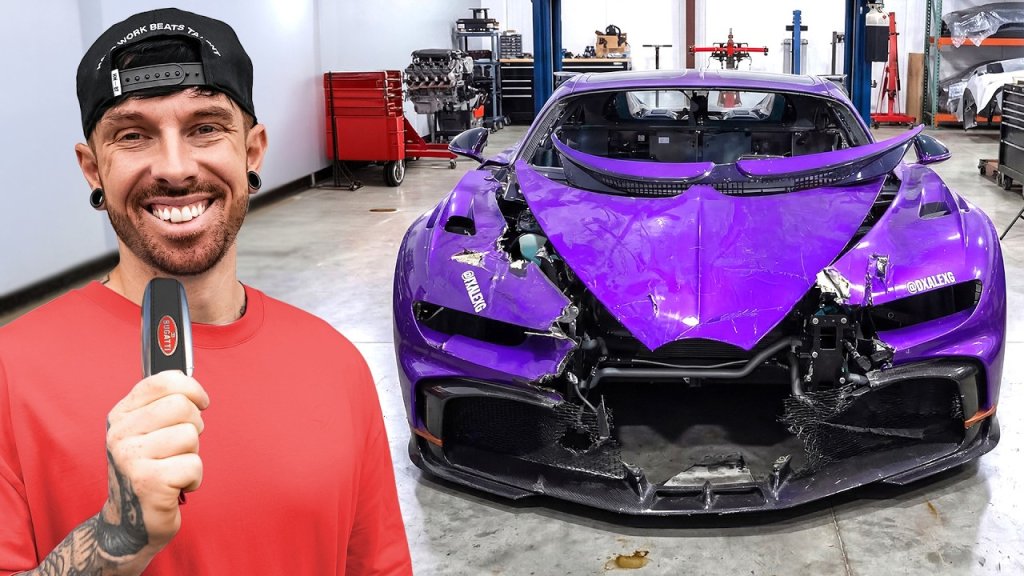
Matthew Armstrong continues his ambitious attempt to rebuild a wrecked Bugatti Chiron Pur Sport, a project that began after the car’s owner, Alex, crashed it and asked him to take on the repair. The car arrived effectively in two pieces:
- The front half of the Chiron
- The rear half containing the W16 engine and gearbox
Bugatti has refused to sell Armstrong any replacement parts, expressing safety concerns and insisting that such repairs can’t reliably be done in a normal workshop. Despite that, in a previous episode he separated the rear subframe and drivetrain from the front, and in this video he focuses on re‑engineering a critical broken engine/gearbox mount, reuniting both halves of the car, and attempting a first start.
Repairing the Crucial Engine and Gearbox Mount
The central technical challenge is a broken cast-aluminium engine and gearbox mounting bracket that also locates three crank position sensors. Armstrong and his team consider two options:
-
CNC‑machining a new mount from a solid aluminium block
- Pros: one-piece construction, potentially stronger than the factory casting.
- Cons: extreme precision required; any dimensional error in the crank sensor locations could cause rough running, no start, incorrect boost control, or persistent engine faults. It would also be very expensive.
-
Repairing the original cast mount
- Pros: retains exact OEM geometry for the crank sensors; significantly cheaper; if the weld is sound, it should be as strong or stronger than original.
- Cons: uncertainty over whether the casting can actually be welded and restored safely.
Armstrong takes the damaged mount to Bob, a machinist and welder. After checking the alloy specification, Bob confirms it’s weldable aluminium, not a problematic high‑magnesium alloy. His process includes:
- Cleaning and preparing the fractured areas
- Fixturing the pieces in a milling machine to ensure correct alignment before and after welding
- Pre‑heating the assembly in an oven so all metal reaches uniform temperature
- TIG welding using appropriate filler rods (4043 and/or 4047), selected for grip and flow characteristics
Bob reports that the welds will be stronger than the original cast material. To further reinforce the component, he fabricates additional ribbed infill sections, first templated in cardboard and then welded onto the casting to add structural stiffness in key areas.
Armstrong decides to use this repaired OEM mount rather than a new CNC piece, acknowledging it’s a calculated risk but trusting the original geometry and Bob’s welding.
Rebuilding the Drivetrain and Rejoining the Chiron
With the mount repaired, Armstrong and his father begin reassembling the Bugatti’s drivetrain:
- The repaired mount is bolted back to the engine using titanium fasteners, allowing the entire engine to hang from Bob’s weld for a real‑world strength test.
- The Bugatti‑branded flywheel is installed, located on a specific dowel so the crank sensors can read the correct reference tooth on the ring gear. All bolts are Loctited and torqued evenly to avoid vibration.
- The gearbox is mated back to the W16. Every electrical connector, solenoid plug, oil line, and breather pipe is carefully routed and reconnected—critical work, as access is extremely limited once the powertrain is back in the chassis.
Armstrong points out a notable detail: the starter motor is the same part used on a Volkswagen 1.9 TDI Passat, sharing identical part numbers despite now being tasked with cranking a quad‑turbo W16.
Managing Unknown Procedures and Fluids
Because Bugatti won’t provide technical data, Armstrong has no official guidance on gearbox oil type, capacity, or fill/bleed procedure. He opts to:
- Reuse the original gear oil drained earlier
- Filter it through the media from a cut‑open oil filter placed in a funnel, to remove any debris
- Refill by measuring against the quantity removed, initially via a breather pipe and then directly into the gearbox’s oil tank
He acknowledges this is partly guesswork due to the lack of access to factory documentation.
Joining Front and Rear Halves
With the drivetrain rebuilt, the team reconnects the front and rear sections of the Chiron. In the factory, Bugatti reportedly uses a dedicated, very expensive alignment rig; Armstrong substitutes that with dollies and careful jacking to align the carbon tub and rear subframe.
Key steps include:
- Repairing a crushed coolant overflow pipe by cutting the damaged aluminium section and replacing it with a rigid rubber fuel hose, secured by clamps. Genuine replacement parts aren’t available from Bugatti.
- Carefully aligning the mating faces of the carbon monocoque and rear structure to avoid stressing the fasteners.
- Installing 14 titanium studs and nuts that hold the rear assembly to the carbon tub.
To set torque values, Armstrong relies on TV and YouTube footage of a German technician torquing similar Bugatti fasteners to 20 Nm and then 70 Nm, since he has no official torque chart.
A Titanium Bolt Snaps – and Why That Matters
While torquing the fasteners, Armstrong applies the same torque spec to all of them. Four bolts under the car, however, are smaller, and one of these titanium bolts snaps off in the carbon tub.
He explains why these fasteners are so delicate:
- The titanium bolts are intentionally brittle in shear so that, in a crash, the rear subframe can separate cleanly from the safety cell (the carbon monocoque) rather than transferring excessive loads to the passenger compartment.
- Using a stronger, more ductile bolt could result in bending instead of controlled breakage.
Fortunately, the broken stud can be extracted without splitting the car again. Armstrong then sources a replacement titanium M8 x 1.25 x 50 mm CNC‑machined bolt for around $11 from a supplier, and plans to install it once it arrives.
With the critical fasteners installed and torqued more cautiously, the team continues:
- Reconnecting the propshaft between front differential and rear gearbox
- Reconnecting long coolant runs and intercooler pipes between front radiators and rear engine
- Reconnecting fuel lines running from the tank integrated in the carbon tub to the engine
- Rejoining wiring looms that handle communication between the front and rear modules
Armstrong notes that visually the car is now structurally back together, though many panels and ancillary components are still missing.
Brakes, Electronics, and Interior Essentials
Before attempting a start, Armstrong wants a functioning brake system and correct communication with the gearbox:
- The brake circuit was opened when the car was split, so they refill with DOT 4 fluid (typical for Volkswagen‑group vehicles) and bleed the system wheel by wheel, beginning at the caliper furthest from the reservoir.
- Both inner and outer bleed nipples on the large calipers are cycled until air bubbles stop and the pedal becomes firm.
Armstrong uses this segment to highlight that, whatever the quality of the repair, the Bugatti’s salvage status will permanently appear on history reports. He references a car history check (via CarVertical) as a tool that will always show this car as damaged and salvage-titled, something that will devalue it in future even if the rebuild is successful.
Inside the car, he re‑installs the transmission ECU under the driver’s seat, placing it close to the gearbox for shorter wiring and weight savings. He then refits:
- Underlay foam and the ultra‑thin floor carpet
- The accelerator pedal module, which he notes is a simple plastic part despite controlling a 1,500 hp powertrain
With the accelerator now in, he feels more confident about how the car’s electronics will respond during the first start attempt.
A One‑Off Exhaust and a Nearly Straight‑Piped W16
One of Alex’s conditions for the rebuild was fitting a new exhaust. Armstrong partnered with Valvetronic, who took the original system, 3D scanned it, and developed a custom, one‑off exhaust in approximately two weeks. The new system features:
- Custom CNC‑milled flanges to interface with the factory hardware
- A complex X‑pipe configuration in the center
- Large‑diameter (around 3.5-inch) bypass sections feeding the outer tailpipes
- Valve‑controlled flow paths to manage sound and backpressure
Armstrong describes the completed exhaust as almost an art piece due to its complexity.
Removing Secondary Catalytic Converters
To reduce backpressure without triggering electronic faults, Armstrong examines the exhaust layout:
- Each turbo feeds primary catalytic converters monitored by upstream and downstream oxygen sensors. Removing or modifying these would likely upset the engine management and could put the car into limp mode unless retuned.
- Further downstream, there are large secondary catalytic converters used mainly for emissions cleanup, with no sensors after them.
He chooses to remove these secondary cats, which he describes as very restrictive, to improve flow and effectively move the car closer to being straight‑piped. Because no sensors monitor this section, the ECU should not directly detect their removal.
The deleted secondary cats contain precious metals, which Armstrong intends to keep and potentially sell. The freed‑up section is then mated to the new Valvetronic exhaust via clamps before being covered with the factory heat shielding. He acknowledges this process is similar to modifications enthusiasts perform on lesser performance cars but stresses this is his first time doing it on a Bugatti.
With the exhaust mocked up and then fully tightened, the rear crash structure, crash sensors, radiators, dual engine ECUs, transmission controller, and fuse boxes are reattached to the rear frame. Extensive wiring is then tidied and reconnected.
Armstrong emphasizes that all connections are now committed—if anything is mis‑plugged or forgotten, access will be extremely difficult without disassembling major sections again.
First Start: Does the Rebuilt Bugatti Actually Run?
The final component needed for a start‑up is the Bugatti’s special lithium‑ion battery, which Armstrong states costs around $40,000. It mounts in a recess under the car, likely chosen for packaging and weight distribution reasons.
He installs it by:
- Bolting the battery pack to the tub using four fasteners
- Connecting the main negative and positive terminals at each side
- Confirming that the car powers up electrically with no visible smoke or immediate issues
Before starting, Armstrong and the team refill hydraulic fluid for the nose‑lift and suspension system. They leave coolant for later because the front radiators are not yet installed, and they already have concerns that Alex previously drove the car for some time without coolant, potentially damaging water pump seals or turbo seals.
The Moment of Truth
With brakes bled, engine and gearbox bolted together, wiring connected, fuel lines in place, and the new exhaust fitted, Armstrong sits in the car and turns the key.
The result:
- The engine starts on the first attempt.
- The new exhaust makes the Chiron audibly louder and slightly deeper in tone, but not dramatically transformed.
Armstrong and Alex comment that:
- The car sounds perhaps 20% deeper and louder than stock.
- It does not approach the dramatic change seen when straight‑piping naturally aspirated cars like a Lamborghini Aventador SVJ.
- The four turbochargers and W16 firing order heavily mute and shape the sound, and Bugatti’s design priorities clearly didn’t center on exhaust drama.
At one point, fuel is seen leaking and briefly flaring concern; they trace this to a fuel line that has simply popped off and refit it. After correction, they re‑start the engine without issue.
Armstrong confirms that the gearbox will engage a drive gear—he gently lets the car move forward to verify that the rebuilt drivetrain and control electronics are at least fundamentally functional.
He sums up the mixed outcome:
- Good news: The car starts, idles, revs, and selects gear. The repaired engine/gearbox mount holds the drivetrain’s weight, and the electronics appear to communicate.
- Bad news: In his view, Bugattis simply don’t sound very exciting even when nearly straight‑piped; the exhaust tone is louder but not transformed into a supercar “showpiece” sound.
He also reiterates that there are still major unknowns:
- Whether the water pump and related seals survived Alex’s previous coolant‑less driving
- Whether the cooling system will function correctly once radiators and coolant are reinstalled
- Whether any long‑term issues will emerge from the improvised gearbox oil refill and the welded mount under load
Armstrong closes the video by noting that, in theory, with the bumper and wheels refitted the car could now drive, but he wants to verify it reaches operating temperature correctly and check for cooling‑related damage in the next episode.
Summary
In this stage of his Bugatti Chiron Pur Sport rebuild, Matthew Armstrong:
- Chooses to repair, rather than recreate, a critical cast‑aluminium engine and gearbox mount, relying on precise welding and added reinforcement.
- Rebuilds and reinstalls the W16 engine and gearbox, reconnecting complex wiring, fluid lines, and crank sensors without official factory data.
- Successfully rejoins the front and rear halves of the carbon‑tub chassis using titanium fasteners, overcoming a snapped bolt and substituting an aftermarket titanium replacement.
- Bleeds the braking system, reinstalls key electronics and the accelerator pedal, and fits a custom Valvetronic exhaust while deleting the secondary catalytic converters.
- Installs a costly OEM lithium battery and performs a first start, confirming that the engine runs, the gearbox selects gear, and the new exhaust is louder but not dramatically different in character.
The episode documents both the ingenuity and the compromises necessary when rebuilding a hypercar without manufacturer support, leaving the next major question unresolved: whether the cooling system and internal seals have survived enough to allow the Chiron to run at temperature and be driven in anger.
Comments
No comments yet. Be the first to join the discussion.